
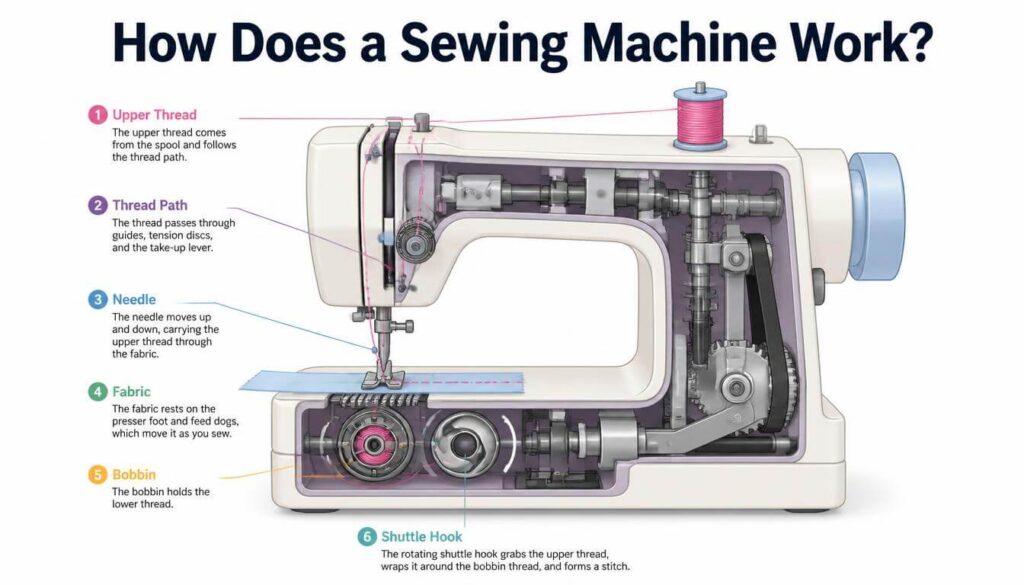
Watch a sewing machine for thirty seconds and it looks almost too simple a needle bobbing up and down while fabric slides underneath. But how does a sewing machine work well enough to lock a thread in place hundreds of times a minute without ever tangling? That part isn’t obvious at all, and once you see it, you’ll never look at your machine the same way.
- Quick Answer: How a Sewing Machine Forms a Stitch
- Why Hand Sewing and Machine Sewing Work Differently
- The Core Mechanisms Inside a Sewing Machine
- Step-by-Step: How a Sewing Machine Forms a Lockstitch
- What Keeps Everything So Precisely Timed
- Mechanical vs Computerized – Does the Basic Mechanism Change?
- What Happens When the Mechanism Goes Wrong
- Helpful Tips for Keeping the Mechanism Running Smoothly
- Common Mistakes People Make Understanding This
- FAQs About How Sewing Machines Work
- Conclusion
- Related Articles
Quick Answer: How a Sewing Machine Forms a Stitch
A sewing machine uses two separate threads — one from the needle above the fabric, one from a bobbin below it — that hook together underneath the material to form a lockstitch. A feed dog moves the fabric forward a fixed distance after each stitch, keeping every stitch the same length. Three coordinated mechanisms make this happen: the needle mechanism, the bobbin and shuttle mechanism, and the feed dog mechanism.
Why Hand Sewing and Machine Sewing Work Differently
Hand sewing uses one continuous thread, passed all the way through the fabric and back again, over and over. It’s called running stitch, and it works because your hand can let go of the needle, pull it fully through, and reverse direction each time.
A sewing machine can’t do that. The needle stays locked to the machine — it never lets go, and it never gets pulled all the way through the fabric and back out the other side. Early inventors spent decades stuck on this exact problem before realizing the fix wasn’t to copy hand sewing at all.
The solution was a completely different stitch: instead of one thread passing back and forth, two separate threads lock together underneath the fabric. This is the lockstitch, and it’s the reason a sewing machine can keep its needle attached the whole time and still form a secure stitch.
The Core Mechanisms Inside a Sewing Machine
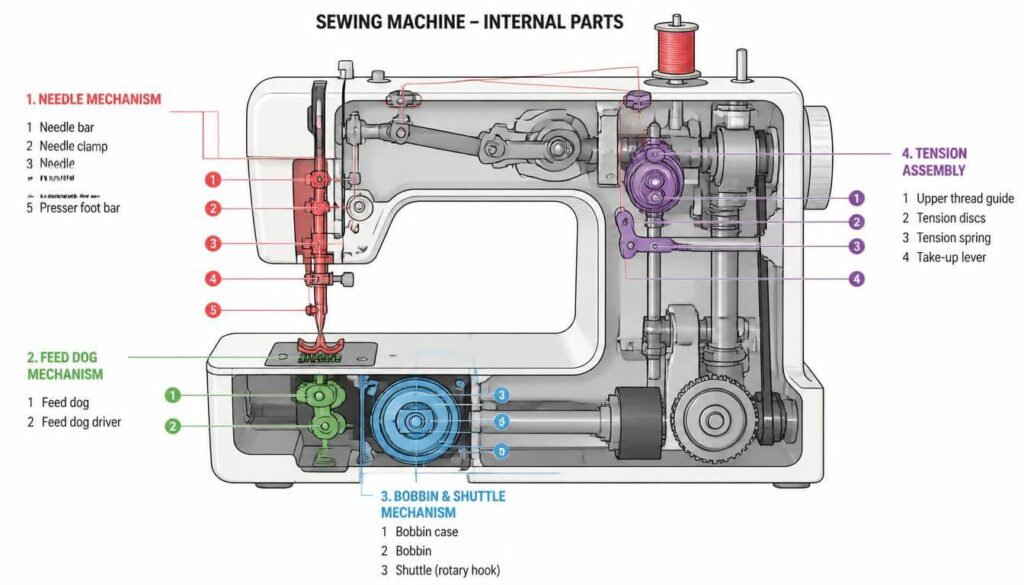
A motor (or hand crank, on older models) drives three separate mechanisms, all carefully timed to work in sync. Miss the timing by even a fraction, and you get skipped stitches or jammed thread.
The Needle Mechanism
This is the most straightforward part. A crank converts the motor’s spinning motion into the needle’s up-and-down motion. Every time the needle drops, it’s not just poking a hole — it’s feeding a loop of top thread through the fabric for the shuttle to catch underneath.
The Bobbin & Shuttle Mechanism
Below the needle plate sits the bobbin, loaded into a rotating case called the shuttle. The shuttle has a hook that spins faster than the needle moves, timed precisely to catch the thread loop the needle leaves behind on its way back up.
The Feed Dog Mechanism
The feed dog is the small set of teeth you can see just under the presser foot. It rises, grips the fabric, moves it forward a set distance, then drops back down and resets — a bit like a tiny conveyor belt working one stitch at a time. This is what keeps stitch length consistent from the first stitch to the last.
The Tension Assembly
Tension discs control how much resistance the top thread feels as it feeds off the spool. Too loose, and the stitch stays weak and floppy. Too tight, and the thread snaps or puckers the fabric. Balanced tension is what makes the lockstitch actually lock, evenly, on both sides of the fabric.
Step-by-Step: How a Sewing Machine Forms a Lockstitch
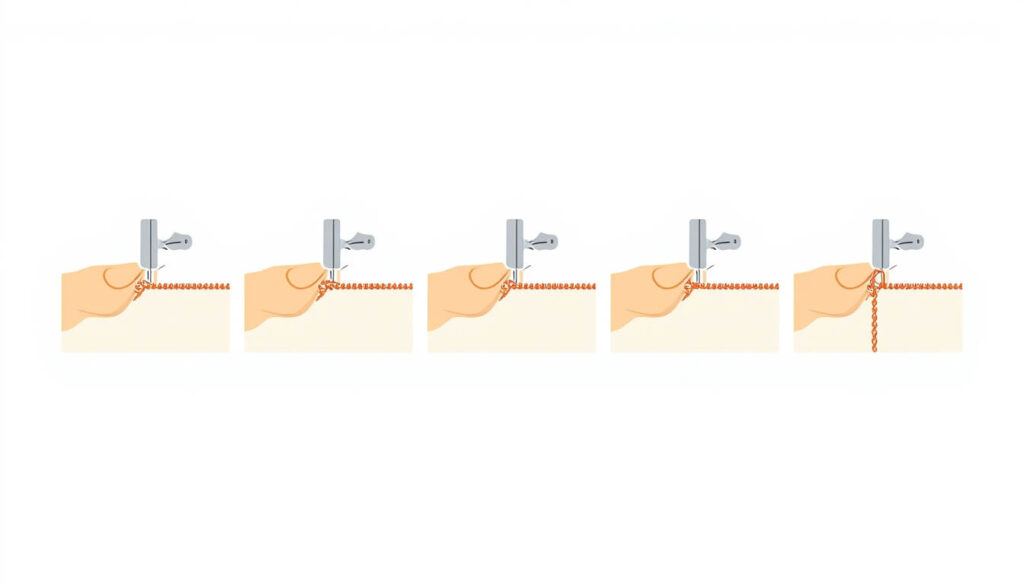
Here’s the part most people never actually see happening, broken into the order it really occurs in.
Step 1 – Needle Pierces the Fabric
The needle starts high, then drives downward through the fabric, carrying a length of top thread with it.
Step 2 – A Loop Forms Underneath
As the needle begins rising again, it leaves a small loop of thread behind, just under the fabric — this loop is the beginning of the stitch.
Step 3 – The Hook Catches the Loop
The rotating shuttle hook swings through that loop and catches it, right on schedule with the needle’s position.
Step 4 – The Stitch Locks in Place
The hook drags the loop around the bobbin case, wrapping it around the bobbin thread so the two threads interlock.
Step 5 – The Feed Dog Advances the Fabric
As the needle finishes rising and pulls the stitch tight, the feed dog moves the fabric forward, positioning it for the next stitch — and the whole cycle repeats.
One mistake many beginners make is assuming the needle alone is “doing the sewing.” In reality, the stitch only forms because the needle, shuttle, and feed dog hit their marks in exact sequence, dozens of times a second at normal speed.
What Keeps Everything So Precisely Timed
All three mechanisms — needle, shuttle, feed dog — are driven off the same main shaft, connected through gears, cams, and cranks. That shared shaft is what keeps them synchronized. If a machine starts skipping stitches or jamming thread, it’s very often a timing issue somewhere in that chain, sometimes as small as a bent needle throwing the hook’s catch off by a fraction of a millimeter.
Mechanical vs Computerized – Does the Basic Mechanism Change?
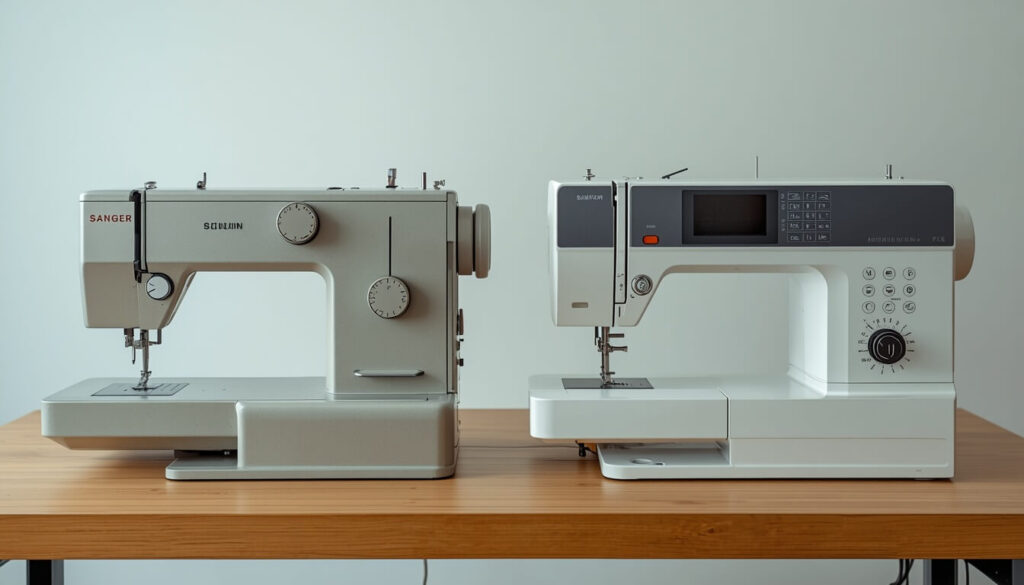
| Feature | Mechanical Machine | Computerized Machine |
|---|---|---|
| Stitch formation | Same lockstitch method | Same lockstitch method |
| Controls | Manual dials and knobs | Digital screen, buttons |
| Stitch patterns | Set by hand each time | Stored and selected digitally |
| What actually changed | Nothing in the core mechanism | Only how settings are controlled |
Here’s the part that surprises most people: even the most advanced computerized machine still forms a stitch exactly the way a 1950s mechanical Singer does — needle, shuttle, feed dog, all working the same basic dance. The computer just automates the settings and stitch selection. It doesn’t replace the underlying mechanism at all.
What Happens When the Mechanism Goes Wrong
Once you understand how the parts are supposed to work together, troubleshooting stops feeling random. A skipped stitch usually means the hook is missing the loop. A jammed bobbin area often means the timing between the needle and shuttle has shifted. Loose or puckered stitches almost always trace back to the tension assembly.
If your machine has started acting up, our common sewing machine problems and solutions guide walks through exactly what to check first, based on which symptom you’re seeing.
Helpful Tips for Keeping the Mechanism Running Smoothly
- Change your needle every 8–10 hours of sewing — a dull or bent needle throws off the hook’s timing
- Keep the bobbin area free of lint, since buildup interferes with the shuttle hook
- Re-thread from scratch if stitches suddenly look uneven, rather than assuming a bigger problem
- Sew a few test stitches on scrap fabric after any thread or needle change
Common Mistakes People Make Understanding This
One mistake many sewists make is assuming a sewing machine works “just like hand sewing, but faster.” It doesn’t — it’s a completely different stitch mechanism built around two threads instead of one, which is exactly why hand-sewing habits don’t always translate directly to machine settings.
Another common mix-up is blaming the needle for every problem, when a mistimed shuttle or an unbalanced tension assembly is just as often the real cause.
FAQs About How Sewing Machines Work
Conclusion
So, how does a sewing machine work, really? It comes down to three parts moving in exact rhythm a needle feeding thread down, a hook catching it from below, and a feed dog quietly walking the fabric forward one stitch at a time. Once that clicks, sewing machine troubleshooting stops feeling like guesswork and starts feeling like common sense.
Curious what your own machine is doing under the hood the next time it acts up? Check our common sewing machine problems and solutions guide, or head to our fabric yardage calculator to plan your next project while your machine hums along.