
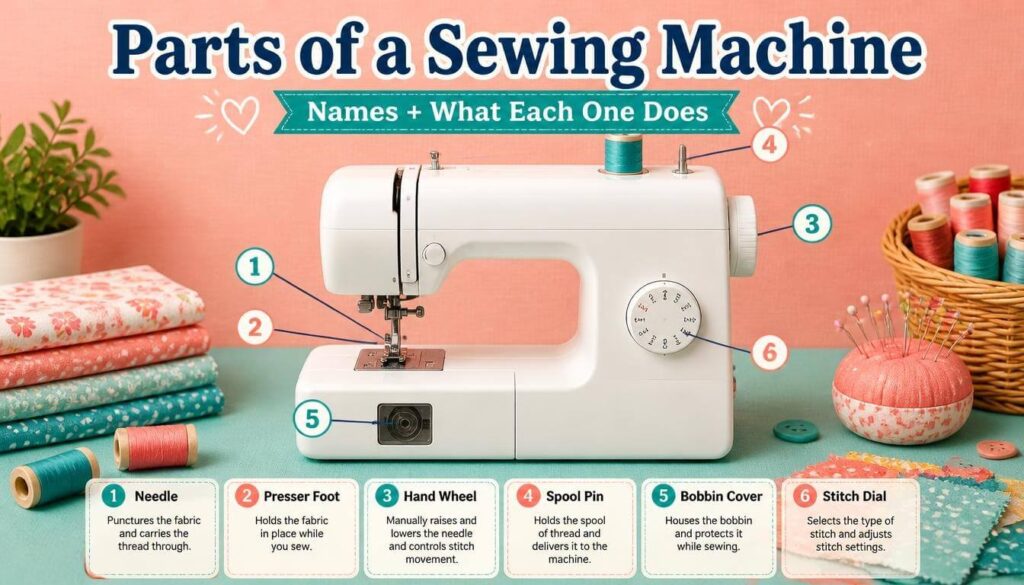
The parts of a sewing machine can look like a crowd of dials, levers and metal bits the first time you open the box. Here’s the good news: there are only about twenty parts worth knowing, and they sit in five clear zones. Once you know the zones, every part has an obvious home.
This guide names each part, shows where to find it, and explains what it actually does. It also tells you which part to check first when something goes wrong. For a deeper look at any single part, follow the links as you read.
Table of Contents
Quick Answer: The Main Parts of a Sewing Machine at a Glance
The main parts of a sewing machine are the needle, presser foot, throat plate, feed dogs, bobbin, spool pin, tension discs, take-up lever and hand wheel. Together they form and lock each stitch while moving your fabric along.
| Part | Where to find it | What it does |
|---|---|---|
| Spool pin | Top of the machine | Holds the thread spool |
| Thread guides | Along the top and front | Steer the thread along its path |
| Tension discs | Behind the tension dial, front top | Squeeze the thread to control stitch tightness |
| Take-up lever | Front, at the top | Lifts thread slack after each stitch |
| Needle | Under the needle clamp | Carries the top thread through the fabric |
| Needle clamp | Bottom of the needle bar | Holds the needle in place |
| Presser foot | Just behind the needle | Holds fabric flat while you sew |
| Presser foot lever | Back of the machine head | Raises and lowers the foot |
| Throat plate | Metal plate under the needle | Supports fabric, has a hole for the needle and seam guides |
| Feed dogs | Teeth below the throat plate | Move fabric forward after each stitch |
| Bobbin and bobbin case | Under the needle plate | Hold the lower thread |
| Hand wheel | Right side | Moves the needle by hand |
| Stitch selector, length and width | Front panel or dials | Choose the stitch type and size |
| Reverse lever | Front panel | Sews backward to lock stitches |
| Foot pedal | Floor | Controls sewing speed |
| Free arm | Narrow end of the bed | Lets sleeves and cuffs slide around it |

Parts of a Sewing Machine Explained by Area
Rather than memorizing a list, it helps to walk around the machine one zone at a time. Every machine, from a basic Singer to a computerized Brother, follows the same layout. Most home machines make a lockstitch, where the top thread and bobbin thread lock together inside the fabric. Wikipedia’s sewing machine overview covers that stitch type if you want the background.
Top of the Machine
The top is where the thread starts its journey.
Spool pin. This small rod holds your thread spool. Horizontal pins lay the spool on its side, and vertical pins stand it upright. A spool cap slides on top to keep the spool from wobbling. If your thread keeps snagging or jumping off, a spool cap that doesn’t fit the spool is a quiet culprit. The spool pin guide shows how to match the cap to the spool.
Thread guides. These are small hooks and loops that keep the thread in the right path. Skip one, and the thread loses its steady pull.
Take-up lever. This is the metal arm that bobs up and down at the front of the machine head. It pulls thread slack up after each stitch to tighten it. Always stop with the lever at its highest point before you remove fabric or thread the needle. If you stop mid-stroke, the needle can pull out of its thread. The way the take-up lever joins the other parts to build a stitch is explained step by step in how a sewing machine works.
Tension discs and dial. Two small metal discs sit inside the machine and pinch the thread. The numbered dial on the front controls how hard they pinch. A quick way to think about it: higher numbers squeeze harder and make the top thread tighter. For most everyday sewing, the default setting is the right place to start. The tension discs guide explains how they work inside, and how to adjust sewing machine tension covers the dial.
Bobbin winder. Usually found on top or at the right, this small spindle fills an empty bobbin with thread. The steps are in how to wind a bobbin.
Needle Area

This is the busiest zone, and the one that wears out fastest.
Needle. The needle has a rounded top called the shank, a long shaft, a groove running down one side, an eye near the point and the point itself. Size and type should match your fabric: a fine needle for silk, a heavier one for denim. The needle size chart helps you choose, needle numbers explained decodes the pack labels, and are sewing machine needles universal tells you what fits your machine.
Needle clamp and needle bar. The needle bar is the metal rod that moves the needle up and down. The needle clamp at its tip holds the needle with a small screw. On most home machines the flat side of the needle shank faces the back, but check your manual because a few brands differ.
Presser foot and presser foot lever. The foot presses fabric against the feed dogs so it moves evenly. A snap-on shank lets you change feet in seconds. The lever, found behind the needle, raises and lowers the foot. Lowering it also engages the tension discs, which is a point many people miss. Sew with the foot up, and you’ll get a tangled nest of thread underneath. The full range of foot types is in what is a presser foot. For thick or slippery layers, such as quilts, see what is a walking foot.
Plate Area
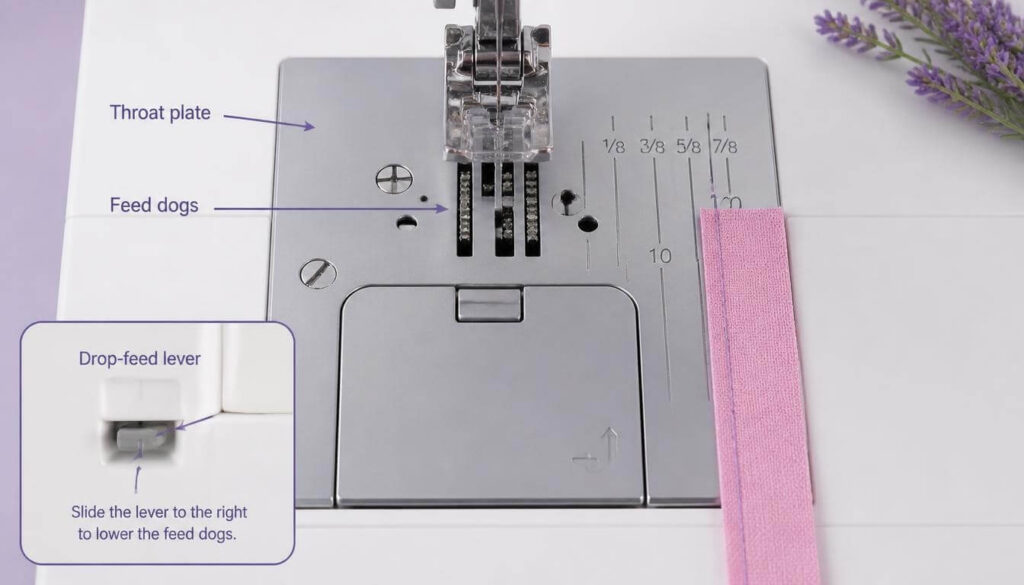
Throat plate. This is the flat metal plate under the needle, also called the needle plate. It has a needle hole, slots for the feed dogs, and engraved lines that show seam allowance widths. If you sew a 5/8-inch seam, line your fabric edge up with the 5/8 mark. More in what is a throat plate.
Feed dogs. These are the rows of small metal teeth that peek through the throat plate. They rise, pull the fabric back, and drop again with every stitch. Many machines have a drop-feed lever that lowers them for free-motion work. Before assuming your machine is broken, check that lever. If it is set to “down” by accident, the fabric won’t move at all. The feed dogs guide goes further, and why your machine isn’t feeding fabric covers the repair side.
Bobbin cover plate. A small slide-in or snap-on cover that hides the bobbin area. It’s the first thing you remove to reach the bobbin.
Bobbin Area and Bed

Bobbin and bobbin case. The bobbin is the small spool holding the lower thread. Machines come in two styles: top-loading (drop-in), where the bobbin sits under a clear cover, and front-loading, where a metal bobbin case is inserted into a housing. The two aren’t interchangeable. What is a bobbin explains the difference, and how to insert a bobbin shows each style.
Hook assembly. Behind the bobbin sits the rotary hook, which catches the needle thread and loops it around the bobbin. You rarely touch it. When it’s out of sync with the needle, the machine needs a timing repair, covered in how to fix sewing machine timing.
Bed and free arm. The bed is the flat base you sew on. On many machines the left end slides off to reveal a narrow free arm. That’s what lets you slip a sleeve or pant leg around the machine. What is a free arm sewing machine shows when to use it.
Controls and Sides

Hand wheel. The big wheel on the right moves the needle manually. Always turn it toward you. Turning it backward can jam the thread or damage the timing. Use it to lower the needle into fabric before you start, or to free a stuck stitch. See what is a hand wheel.
Stitch selector, stitch length and width. On a mechanical machine these are dials, and on a computerized machine they are buttons or a screen. Length is usually in millimeters. Around 2.5 mm is a common starting point for regular seams on medium-weight fabric.
Reverse lever or button. It sews backward for a few stitches at the start and end of a seam. This locks the thread so seams don’t unravel.
Foot pedal and power switch. The pedal sets your sewing speed, and the power switch is usually on the right side. Many modern machines also have a start/stop button and a speed slider.
Real Example: Tracing the Thread Path to Name Each Part
Here’s a simple way to make the parts stick. Imagine you’re threading the machine for a plain cotton seam.
Your thread starts on the spool pin, goes through the first thread guide, and then runs between the tension discs. It drops down, loops around the take-up lever, and comes back down through a lower guide. Finally it passes through the needle‘s eye. Below the throat plate, the bobbin thread waits to meet it. Seven parts, one path.
When the foot comes down, the presser foot holds the fabric against the feed dogs. As you press the pedal, the needle drops, the hook catches the loop, and the feed dogs nudge the cloth forward. For the step-by-step threading routine, use how to thread a sewing machine needle.
Step-by-Step: How to Find Every Part on Your Own Machine
Machines vary, so spend five minutes with yours. You’ll need your manual, or the model name from the label on the back.
- Unplug the machine. Start with power off and the foot pedal unplugged.
- Start at the top. Find the spool pin, thread guides, take-up lever and tension dial. Touch each one.
- Move to the needle. Look at the needle clamp and the presser foot. Lift and lower the presser foot lever and watch what moves.
- Check the plate. Look at the throat plate markings and the feed dog teeth through the slots.
- Open the bobbin area. Remove the cover. Note whether you have a drop-in or front-load system.
- Turn the hand wheel toward you. Watch the needle bar and take-up lever move together.
- Label the controls. Use tiny strips of masking tape to mark the stitch dial, reverse lever and drop-feed lever.
If you’ve just unpacked a new machine, how to set up a sewing machine walks you through the first stitch.
Mechanical vs Computerized: Which Parts Change?
The core parts stay the same on every machine. The differences are mostly in the controls.
| Feature | Mechanical machine | Computerized machine |
|---|---|---|
| Stitch selection | Dial | Buttons or screen |
| Tension | Manual dial | Often automatic, with manual override |
| Needle up/down | Hand wheel | Button on the panel |
| Needle threader | Sometimes built in | Commonly built in |
| Speed control | Foot pedal only | Pedal plus speed slider |
| Home repair | Easier to access | Electronics need a technician |
For example, if you only sew hems and repairs, a mechanical machine has fewer parts to break. Someone who loves decorative stitches may prefer a computerized one. What is a sewing machine compares the main types.
Quick Troubleshooting Checklist: Which Part to Check First
When something goes wrong, the symptom usually points to one part.
| Symptom | Part to check first | Full guide |
|---|---|---|
| Skipped stitches | Needle (bent or wrong size) | Skipping stitches |
| Fabric won’t move | Feed dogs and drop-feed lever | Not feeding fabric |
| Loops under the fabric | Presser foot lever and upper threading | Looping underneath |
| Top thread keeps snapping | Tension discs and needle | Thread breaking |
| Needle snaps | Needle, presser foot, fabric weight | Needle breaking |
| Clunking or grinding | Bobbin area and hook | Machine noise |
| Handwheel won’t turn | Bobbin area and thread jam | Not moving forward |
A quick example: your machine sewed fine yesterday, but today the stitches skip in the middle of a seam. Before touching any dial, swap in a fresh needle. It’s the cheapest fix and solves more problems than most people expect.
Helpful Tips for Learning Your Machine’s Parts
- Learn one zone per sitting. Top first, then needle, plate, bobbin and controls. Five short sessions beat one long one.
- Keep the manual handy. Brands name parts differently. One manual calls it the “needle plate”, another the “throat plate”, and both mean the same piece.
- Take a photo of your threading path with your phone before you unthread anything.
- Clean the feed dogs and bobbin area regularly. Lint packs in fast, and how to service a sewing machine shows how.
- Note your model number. You’ll need it when buying replacement feet, bobbins or other parts.
Common Mistakes With Sewing Machine Parts
- Mixing up the bobbin and bobbin case. The bobbin is the thread spool. The case is the housing some machines use to hold it.
- Turning the hand wheel backward. It can tangle thread or throw off timing.
- Sewing with the presser foot up. The tension discs disengage, and the thread bunches under the fabric.
- Twisting the tension dial first. In most cases the real problem is threading or the needle. The tension fixing guide explains the right order.
- Buying a part that only looks right. Feet, bobbins and bobbin cases vary by brand and model, so match the model number.
When to Call a Professional
Many problems are simple fixes, but a few belong in a repair shop:
- The needle keeps hitting the bobbin case even with a fresh, correct needle.
- You hear grinding after cleaning and oiling.
- The hand wheel is locked and won’t move after you’ve cleared the thread.
- You smell burning, or the pedal or cord is damaged.
If you aren’t sure, how to repair a sewing machine shows what’s safe to try at home first.
FAQs
What are the main parts of a sewing machine?
The main parts are the spool pin, thread guides, tension discs, take-up lever, needle, presser foot, throat plate, feed dogs, bobbin, hand wheel and foot pedal. Together they carry the thread, form a stitch and move your fabric through the machine.
What is the most important part of a sewing machine?
No single part works alone, but the needle is the one most likely to cause problems. A bent, dull or wrong-size needle causes skipped stitches, snapped thread and fabric damage. It’s also the cheapest part to replace, so check it first.
Is a throat plate the same as a needle plate?
Yes. Throat plate and needle plate are two names for the same flat metal plate under the needle. It has the needle hole, feed dog slots and seam guide lines. Brands use either term, so check which one your manual uses.
Where is the bobbin on a sewing machine?
The bobbin sits below the throat plate, under a small cover on the bed of the machine. Drop-in machines show it through a clear cover. Front-loading machines hold it in a metal bobbin case inside a housing at the front.
What does the hand wheel do?
The hand wheel moves the needle up and down by hand. Turn it toward you to lower the needle into fabric, to raise it before removing your project, or to free a snag. Turning it backward can jam thread or affect timing.
What does the take-up lever do?
The take-up lever moves up and down with the needle. It pulls slack thread upward after each stitch so the stitch sits tight. It also feeds out thread as the needle goes down. Always stop with the lever at its highest point.
Are sewing machine parts interchangeable between brands?
Some are, some aren’t. Needles fit most home machines, but feet, bobbins and bobbin cases vary by brand and model. Always check your model number before ordering, and see are sewing machine needles universal for needle fit.
Conclusion
Knowing the parts of a sewing machine takes the mystery out of every threading step, setting and problem. Learn the five zones, label the controls, and keep this page nearby when a symptom turns up. A bent needle, a lowered drop-feed lever or an unthreaded take-up lever is usually the whole story.
Next, pick a part that confuses you most and read its guide from the links above. A few minutes with your own machine will teach you more than any diagram.
Now that you know your machine, plan your next project the smart way. Use the fabric yardage calculator to work out exactly how much fabric to buy before you cut.